Browsing the Hub#
This page contains all the information you need to browse and manage Groups, Repositories, Publications and Files. On top of that, Approved Applications are introduced.
Groups#
Groups form the main structure for all content on the platform. Groups allow you to add structure to your repositories and manage access for other users on a high level. For example, you can cluster repositories based on organization, team, owner, project, theme, etc. Apart from repositories, groups can also contain nested groups, or subgroups, to further organise your data.
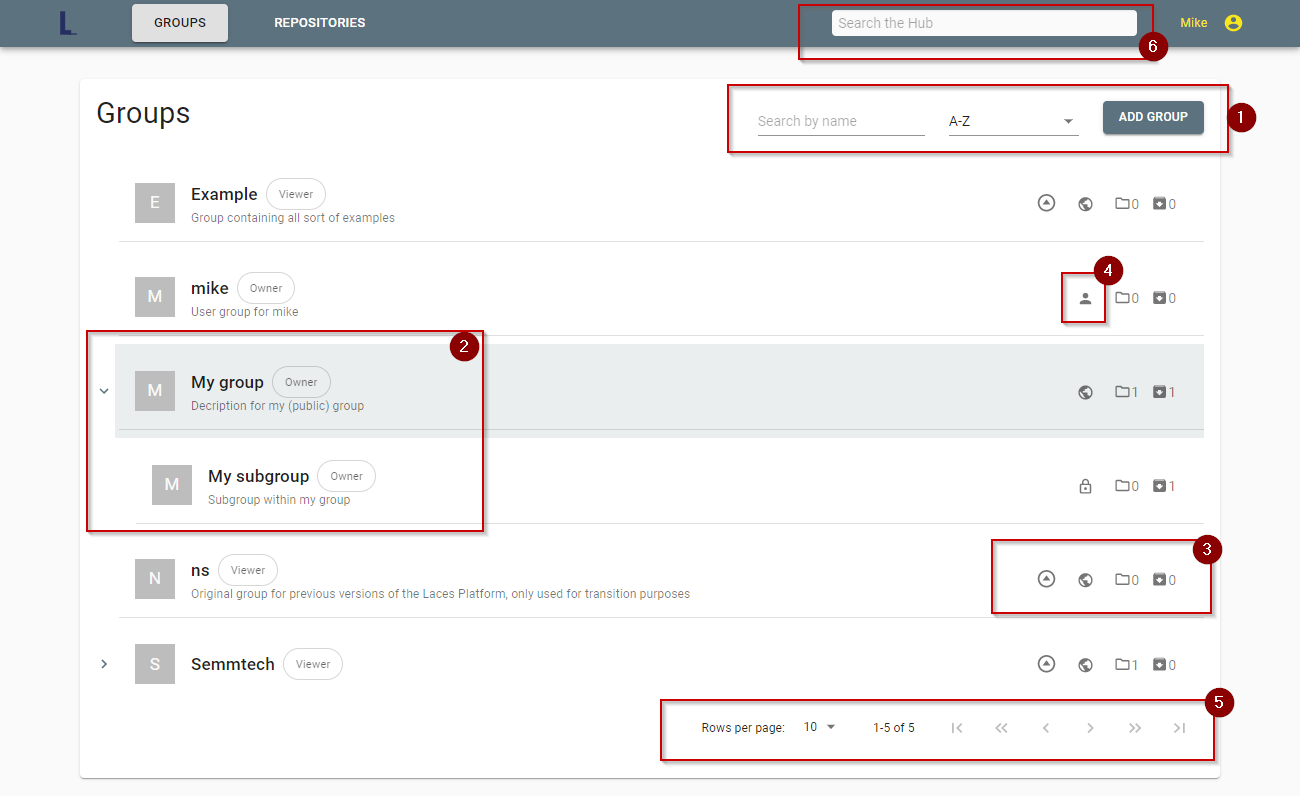
First of all, it is possible to add new groups and to sort or filter the list of available groups (1). Note that this search function will not look for any repositories.
On the left side, you can see the group name and description. If you are member of a group, your access level will be shown to the right of this icon (i.e. ‘Viewer’, ‘Publisher’, ‘Manager’ or ‘Owner’). It is possible to expand a group to see the subgroups it contains using the arrow to the left of the group (2).
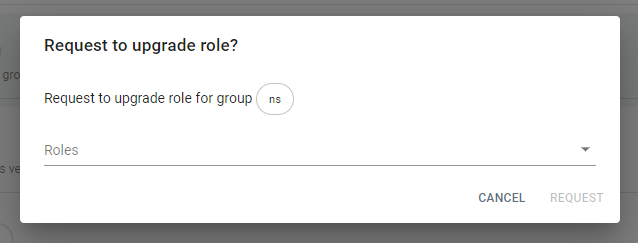
All the way on the right, you can see how many direct subgroups and repositories a group contains. A globe or lock icon is used to indicate whether a group is public or private, respectively. When you are not the owner or manager of a Group, but you have been granted access, you can also request an upgrade to your access on the right-hand side using the upwards pointing arrow (3). Clicking the arrow will open a screen where you can select the desired role and send the request to the manager(s) of the group.
Every user in Laces Hub has their own personal, private group which cannot be removed. You can recognise this User group on your overview because it will share your username. User groups can also be recognised by the user icon on the right (4).
At the bottom of the screen you can navigate through the pages of accessible groups (5). Using the arrows you can go back or forth one or 10 pages at a time, or move to the first/last page instantly. The setting on the left can be used to determine how many groups should be shown per page.
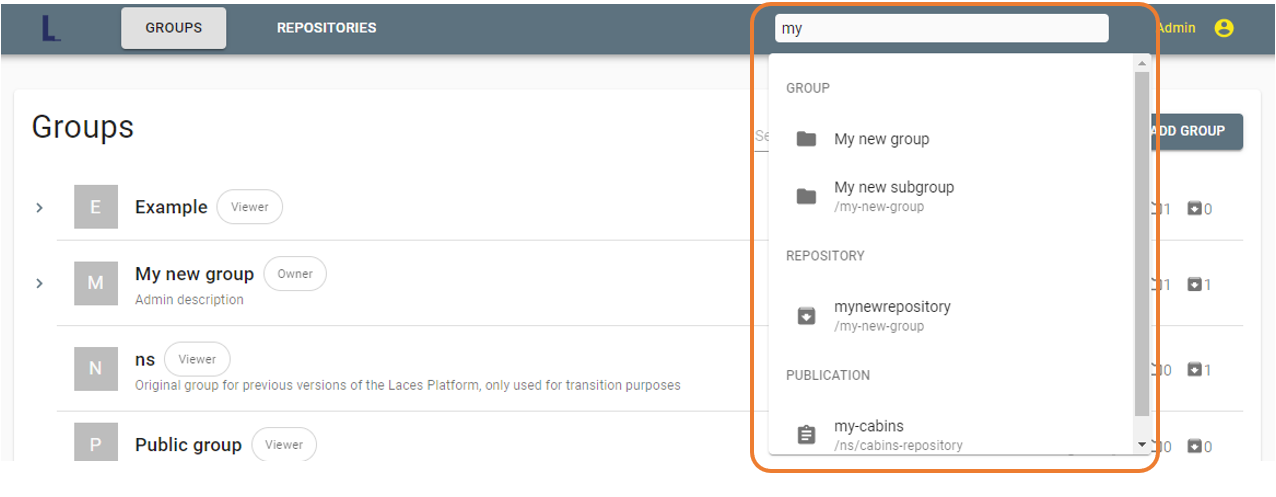
Note that it is always possible to use the search bar at the very top of the screen to search for any group, repository or publication (6).
Adding a Group#
After adding a group in the groups overview, you are presented with the following screen.
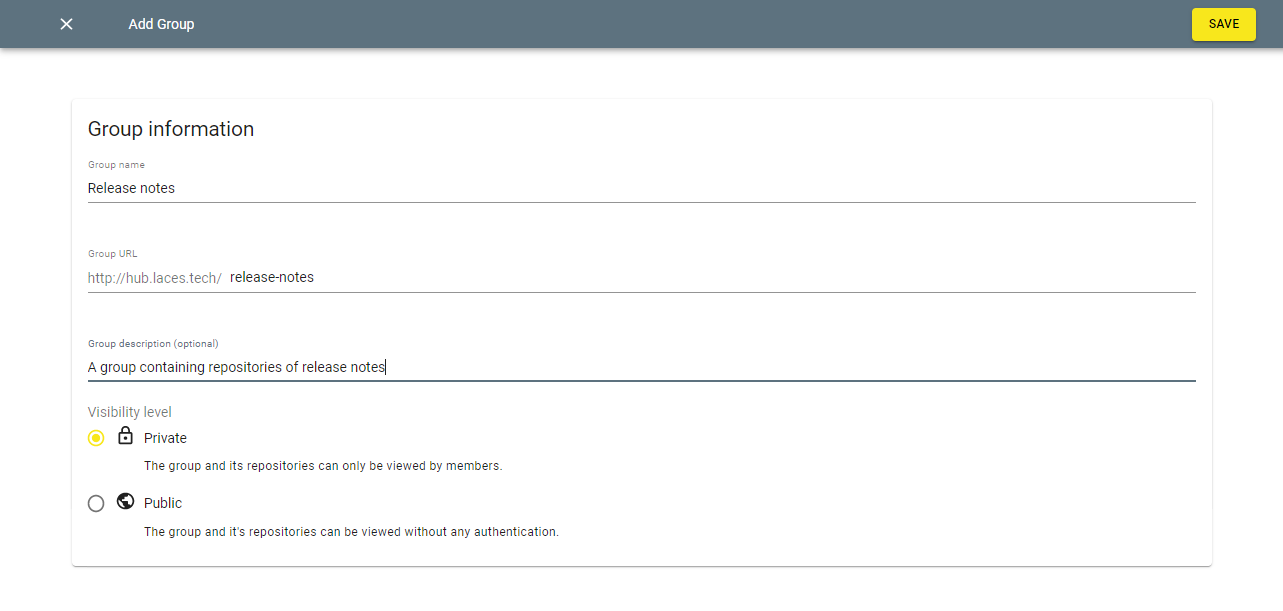
Here you can enter the new name for your group. While typing, a Group URL is automatically created based on your group’s name. You can still choose to change the Group URL if you prefer. Note: after creating the group, this URI is fixed. You can also add a description to your group, to add information on what your group is about.
Finally, you can set the visibility of your group to public or private.
- Public means that anyone will be able to see your group. Therefore, any user of the Hub will have viewer access to such a group. Subgroups and repositories within a public group can still be set to private, to restrict their visibility.
- Private groups are not visible to users, unless they have been granted access to the group. All subgroups and repositories within a private group will always be private too.
When done, you can select ‘Save’ in the top-right corner.
Managing a Group#
When you have selected a group, you can choose to create another, new sub-group, or you can choose to add a repository to the Group.
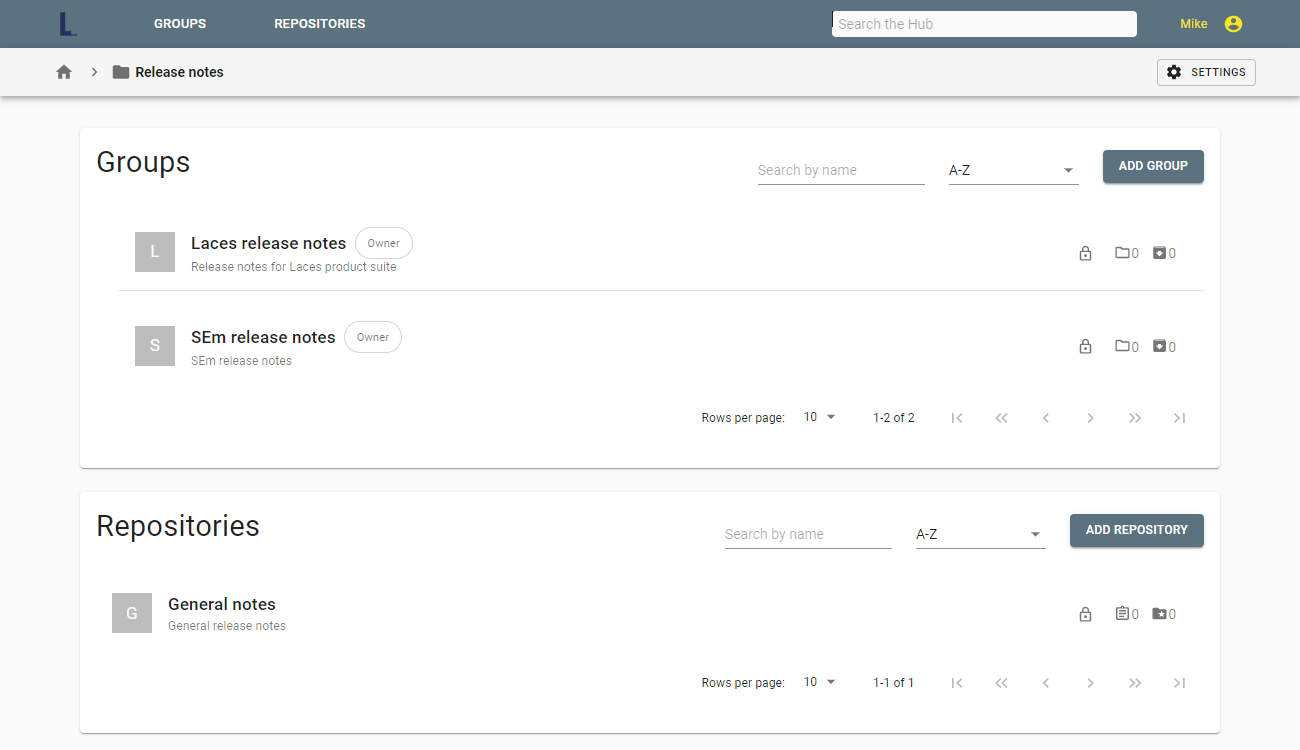
Just as on the highest (top-level) group overview, you can browse your groups by means of sorting or by searching.
On top of that, there is a repository overview where you can see existing repositories and create new ones. For each repository, you can also see the number of publications within on the right-hand side.
After clicking the Settings button in the top-right corner, you can edit the group name, description and visibility. The members button on the left side opens the page where you can manage users' access to the group. Note: the settings are only available to a group manager or owner.
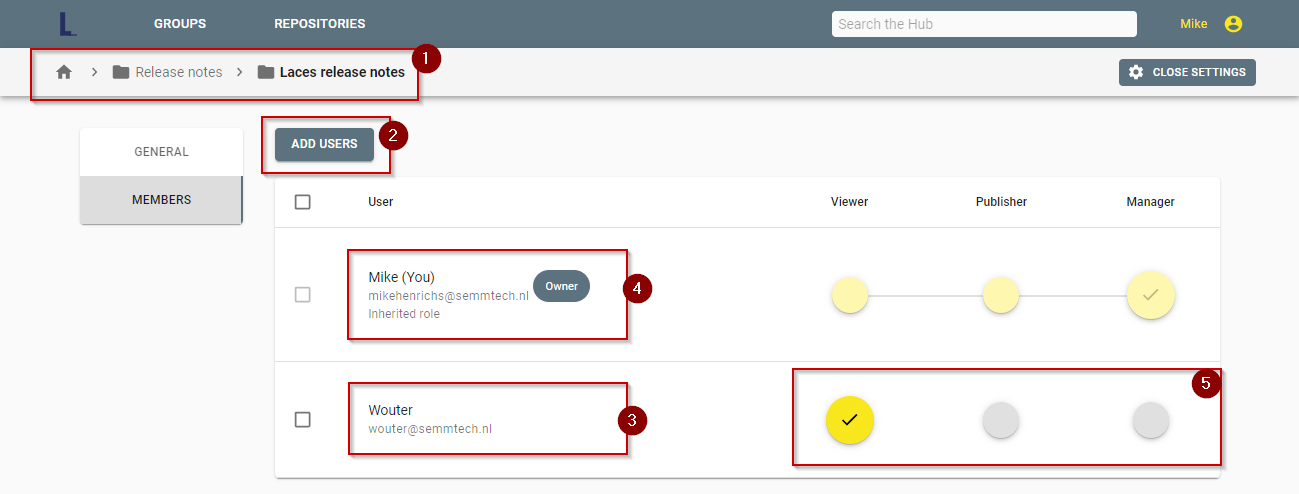
In the top-left corner, you can see where you are within the group structure (1). In the screenshot, the user is located in the Laces release notes group, which is a sub-group of Release notes.
New members can be added to a group by using the Add users button (2).
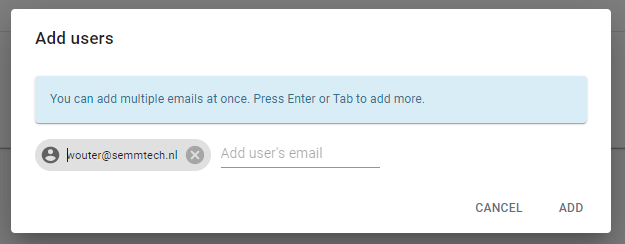
In order to add a member to the group, you must provide the email address of the user and press enter or tab.
All Hub users which are already members of the group will be shown in the User column (3) (4). The group owner is indicated by a Owner badge (4). Once the access level of a user has been set on a group, this access will be inherited by all of its sub-groups and repositories. In this case, it is only possible to give such a user extra rights on the sub-group or repository; the user can never have lower access rights on a sub-group than on the group above. Inheritance is indicated below the user name in the table (4).
There are four access levels for groups and repositories:
- Viewer: A viewer can see and access a group/repository. If a repository contains publications, a viewer is allowed to see and query these as well.
- Publisher: A publisher has all the rights of a viewer, but can also create, edit and delete publications.
- Manager: On top of the publisher's rights, a manager can edit the group/repository settings and add/remove members.
- Owner: Each group or repository can have only one owner. This user is the only person who can change the visibility of a group/repository and delete it. The group owner can only be set on a top level group and will be inherited by all of its sub-groups and repositories.
Repositories#
Repositories are containers for related publications and/or files. They often will be dedicated to a single project or purpose. Despite the differences in purpose between repositories and groups, they have a very similar user interface.
Creating a repository#
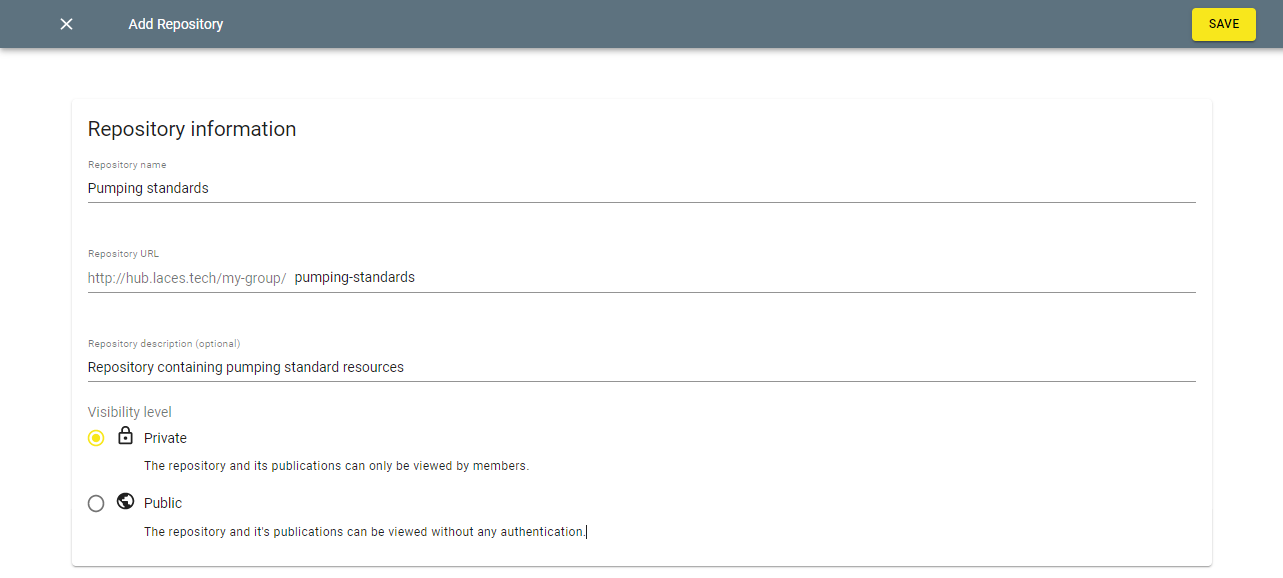
Within a Group, you can select ‘Add Repository’. Once selected, you can specify your new Repository by adding a name and description, and specify its visibility level on either Private or Public within the context of your group. Note that you cannot create a public repository within a private group. The options here are the same as for adding a group.
Repositories overview#
If you select the ‘Repositories’ button on top, you will get an overview of the repositories available to you.
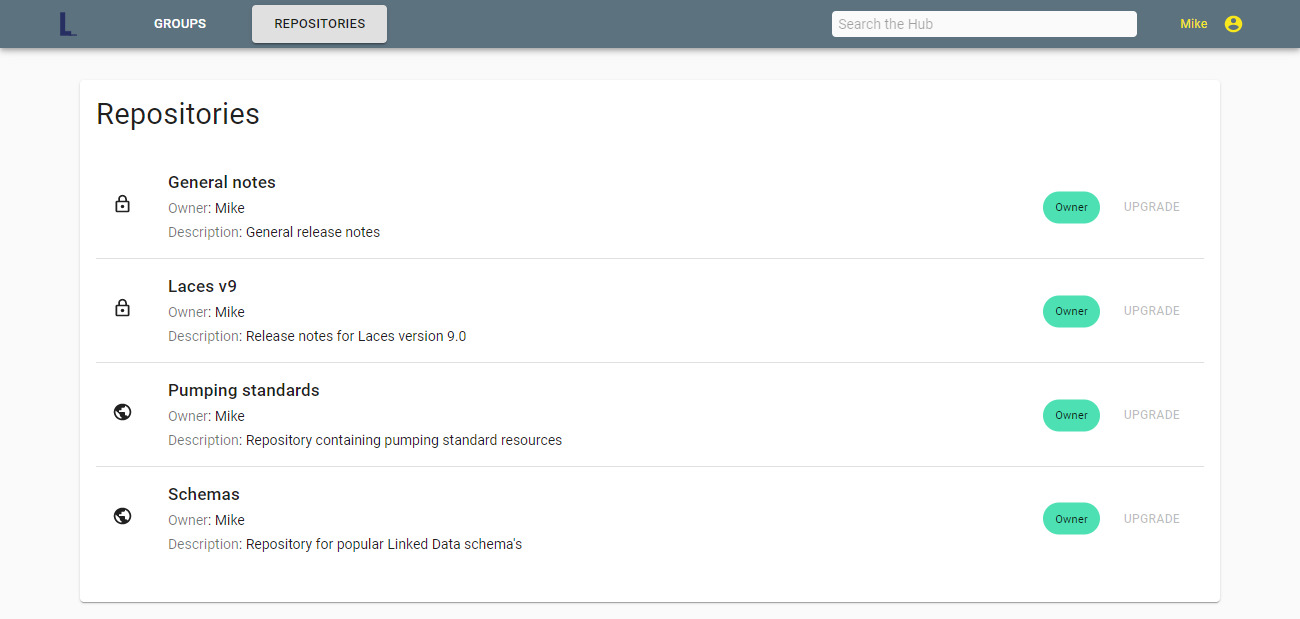
Just as with groups, you can see what rights you have as a user to those repositories. By selecting ‘upgrade’, followed by the specification of what role you would want, you can request an upgrade your access rights.
The repositories which are public can be recognised by the ‘globe’ icon, while private repositories can be recognised by the ‘lock’ icon.
Selecting a Repository#
When you select a repository, you can see what publications are stored within that repository. The versioned publications are presented together, as are the non-versioned publications.
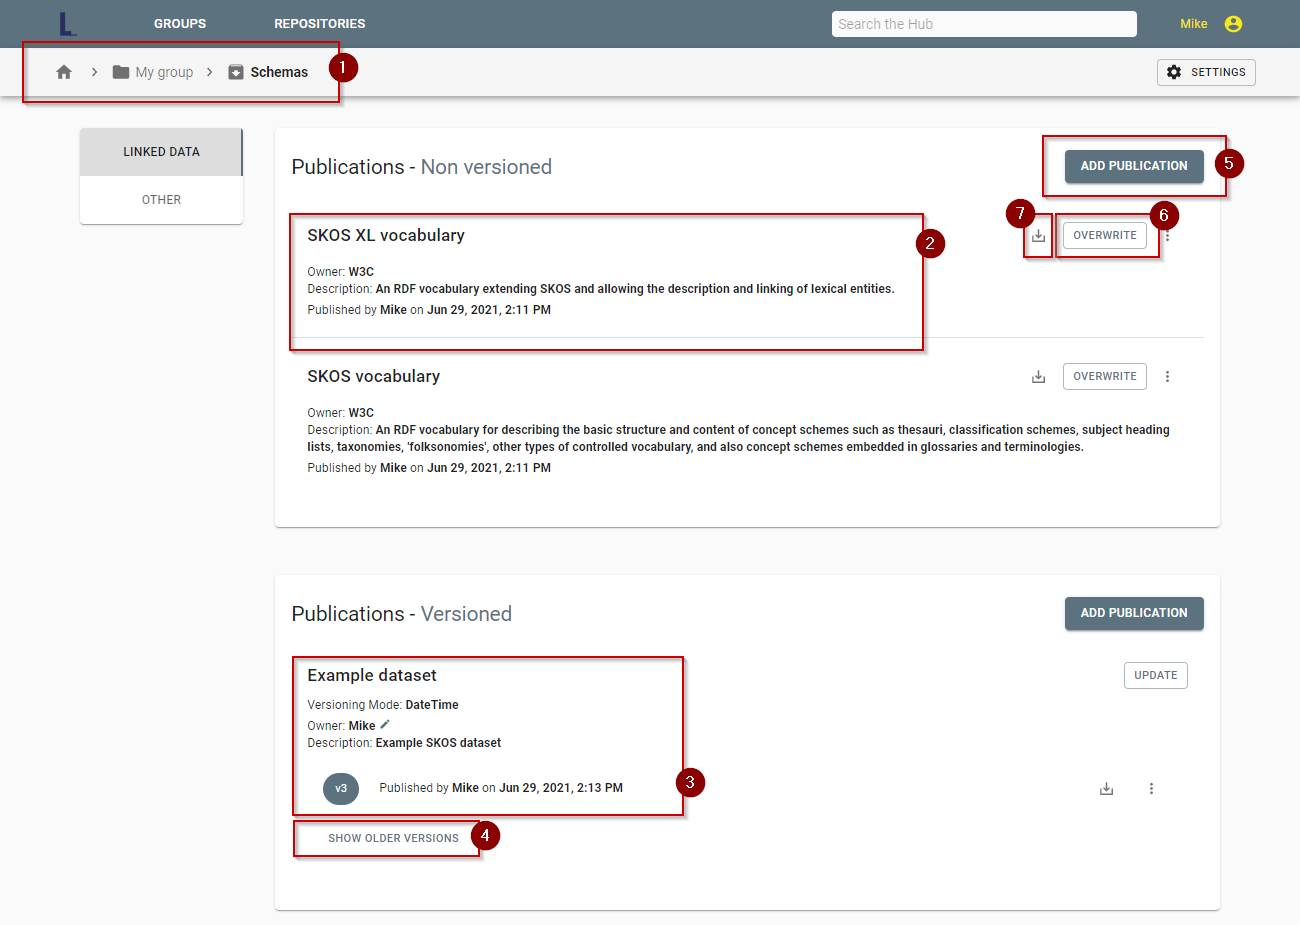
In the top-left corner, you can see your location within the Hub as always. In this case, it is the repository Schemas within the My group group (1).
For each publication, its name, owner and description (if present) are shown (2). In case of versioned publications additionally the versioning mode, together with the latest version is shown (3). In order to expand a publication's versions, click show older versions (4).
Finally, it is possible to add new publications (5), overwrite or update an existing publication (6) or download a publication (7). Non-versioned publications can only be overwritten, while versioned publications can only be updated to add a new version.
Publications#
Publications are collections of RDF data. All data found in one publication, together represent a single coherent dataset.
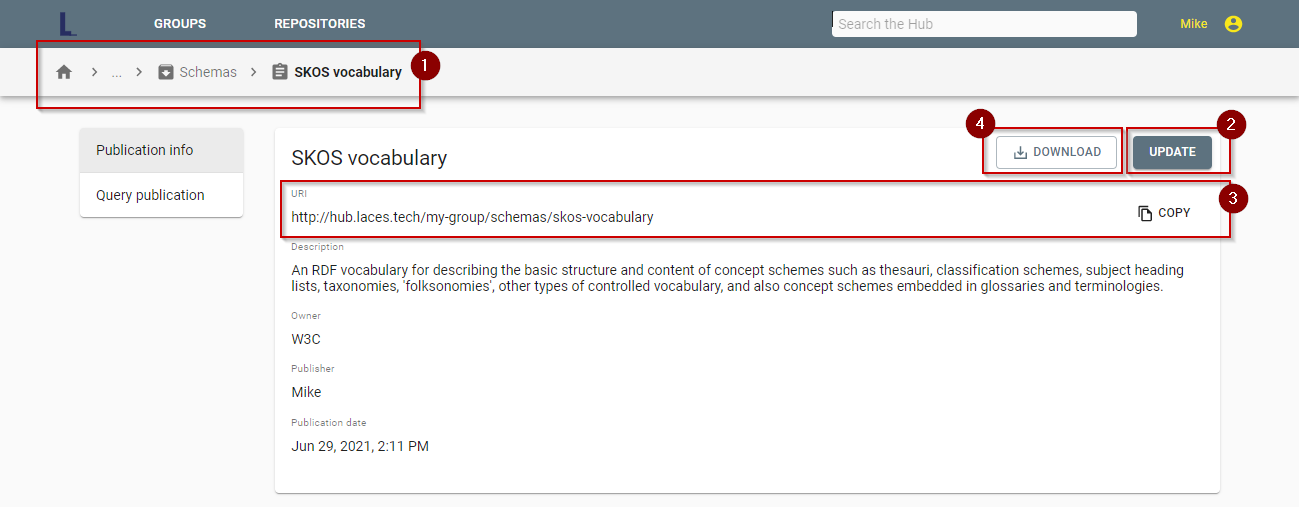
The breadcrumbs in the top-left corner once again show your location within the Hub structure (1). In this case, the SKOS vocabulary publication within the repository Schemas.
Users that have at least Publisher access can edit the description and publisher (2).
The publication URI can be copied easily using a dedicated Copy button (3).
To download the publication, simply press the download button (4).
Querying a publication#
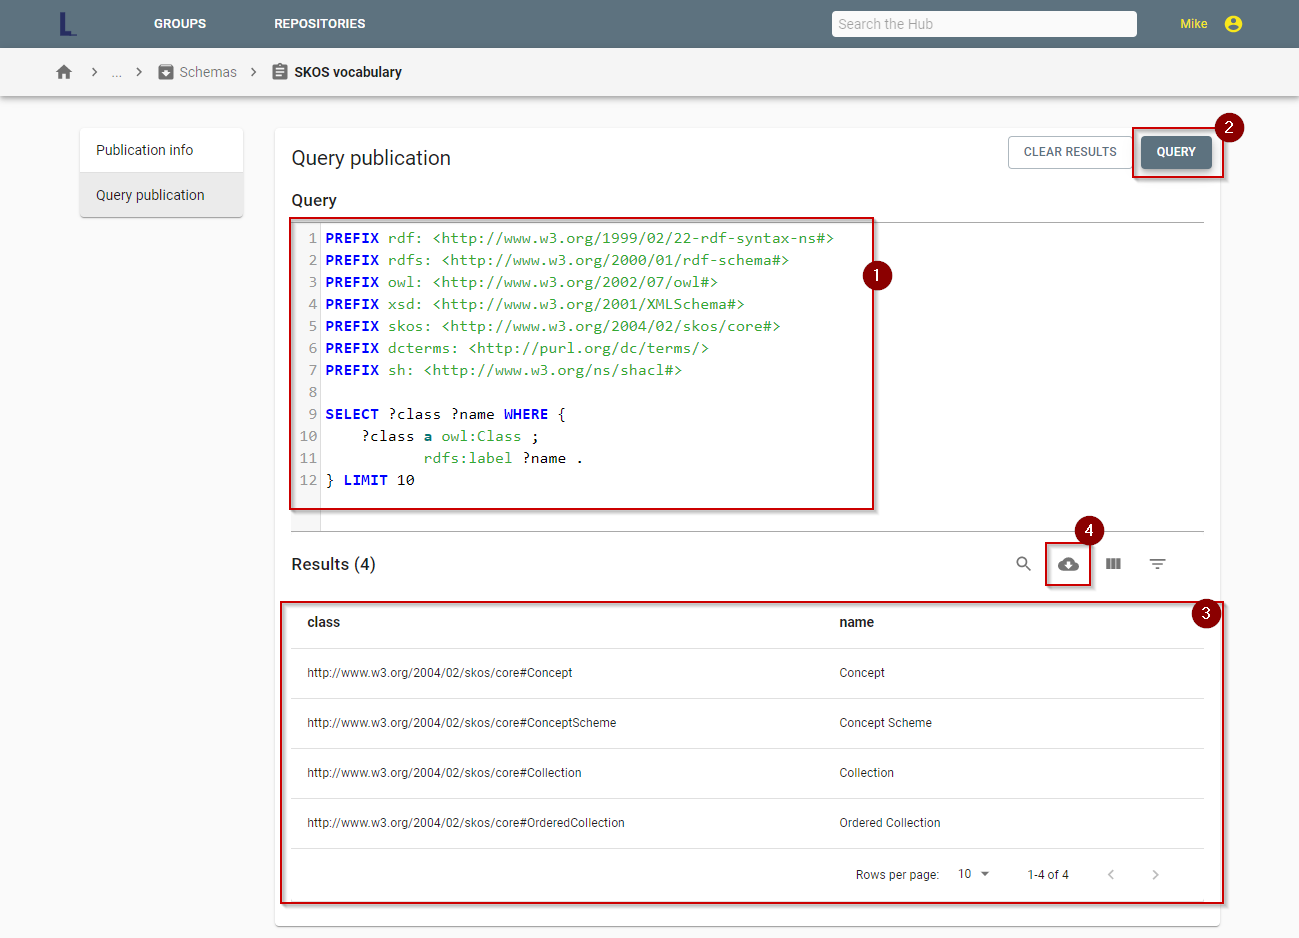
Publications can also be queried directly from the Hub user interface. To do this, navigate to the Query publication screen within a publication (version). You can write your custom query here (1) and press on the Query button (2) to view all results (3). The results can also be downloaded in CSV format (4).
Files#
As of version 9.0 repositories can now also hold non-RDF data, like images or documents and other types of files. While in a repository click on the Other menu option to the left of the publications. This will show the files already added to a repository.
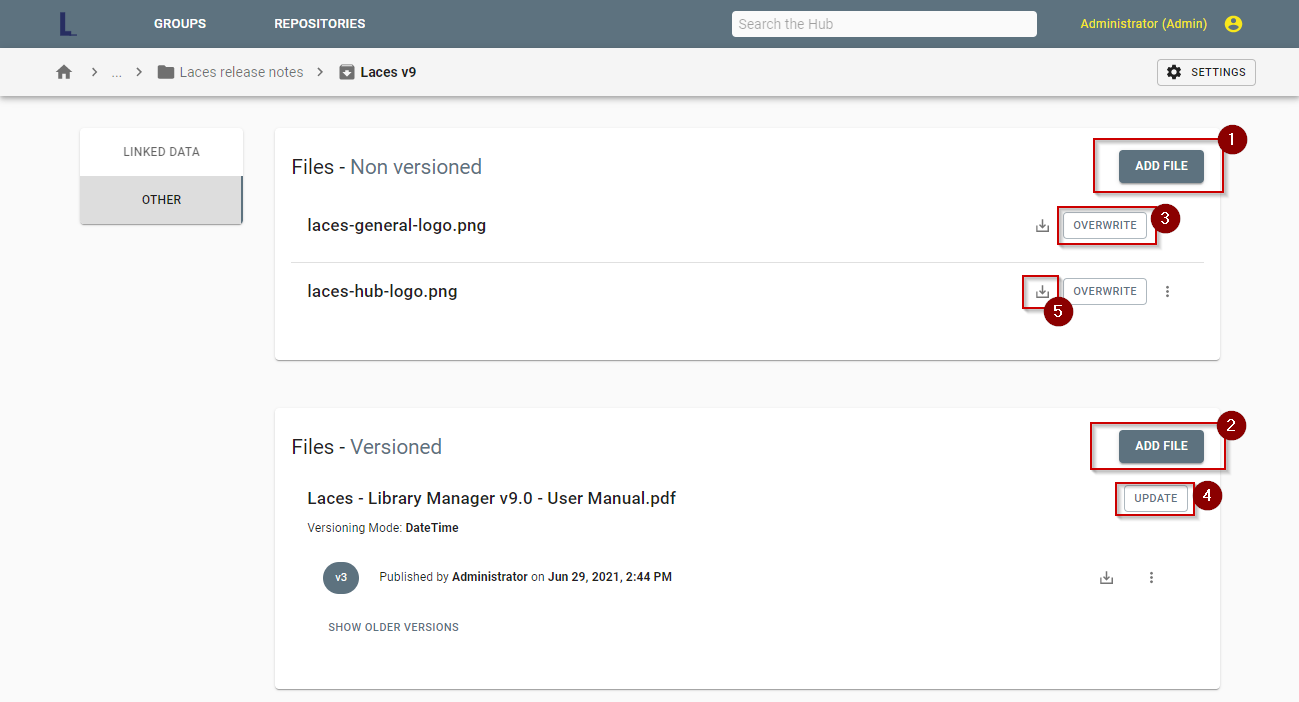
Just as with publications, files can be either versioned or simply consisting of a single version.
From within the overview you create and upload a new file, using the 'Add File' button (1) or (2). Already uploaded files can be either overwritten, in case of non-versioned files (3) or updated (4) in case of versioned files, which will create a new version of the file, while keeping the previous version. And finally files can be downloaded (5).
Requests#
When a user requests (upgraded) access to a group or repository, the manager(s) and/or owner will be notified by email.
Handling Requests#
To navigate to the pending requests, select your Profile icon in the top-right corner and then select Requests.
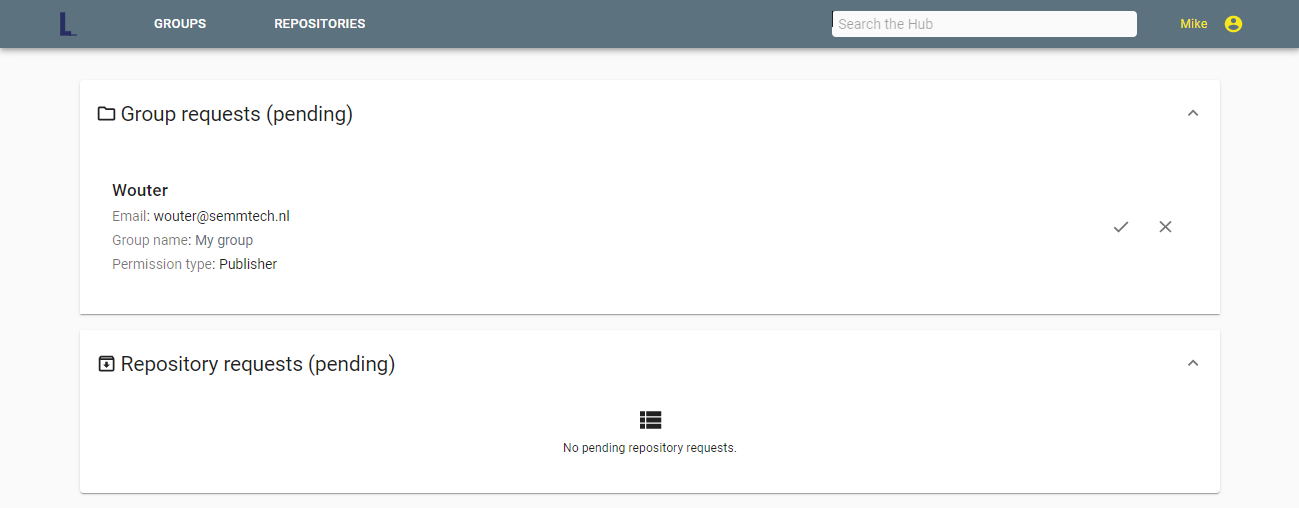
Here, you have an overview of pending requests to your groups or repositories. Each request shows the user who initiated the request (including their email), the group/repository for which the request has been made and the requested access level. Using the check mark or x, you can either accept or deny the request respectively.
Searching the Hub#
Using the search bar at the top of the screen, it is possible to search the Hub for groups, repositories and publications at the same time. Of course, the search results will only show items that the user has access to.
Approved applications#
To make efficient use of the data on the Laces Hub, you can connect applications to it. Each user can create Approved Applications and provide these with permissions to groups and repositories, using the permissions you have as user for these groups and repositories.
For more information on communicating with the Hub API, see the Security page.